Trigger Survey3/2 Camera From Pixhawk (PX4/APM) Flight Controller
This guide walks you through the hardware and software modifications required to trigger the Survey3/2 cameras from a PWM signal using the Survey3/2 HDMI Trigger Cable.
Disclaimer: Proceed at your own risk, we are not liable for any damage you may cause to your UAV or camera as a result of these instructions. If you follow everything correctly you will not cause any damage and can easily revert back to the original settings by doing a factory reset.
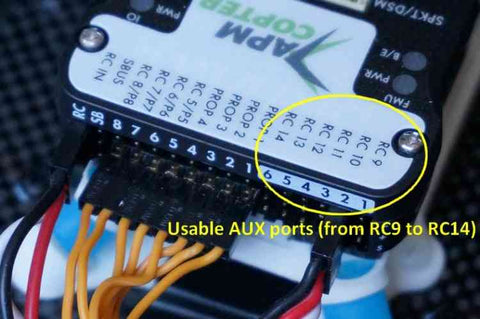
Step 1: Insert servo plug from HDMI trigger cable into Pixhawk AUX PWM port of your choice (typically the second slot, RC10 port). Make sure the white cable is in the bottom PWM signal row of pins just like the below photo:
Step 3: Connect Pixhawk to your computer using USB cable. Open Mission Planner and click Connect button at top right.
Step 4: Click "Config/Tuning" button at the top of screen. Click "Full Parameter List" on the left. In the search box on the right type "rc7_function". Confirm the value is 0.
Step 5: At the top click the "Initial Setup" button, click "Optional Hardware" on the left, and then "Camera Gimbal". Change the values for the Shutter section according to the below values and then press ENTER on your keyboard:
RC10
Servo Limits:
Min 1000
Max 2000
Shutter:
Pushed: 2000
Not Pushed: 1000
Duration: 1
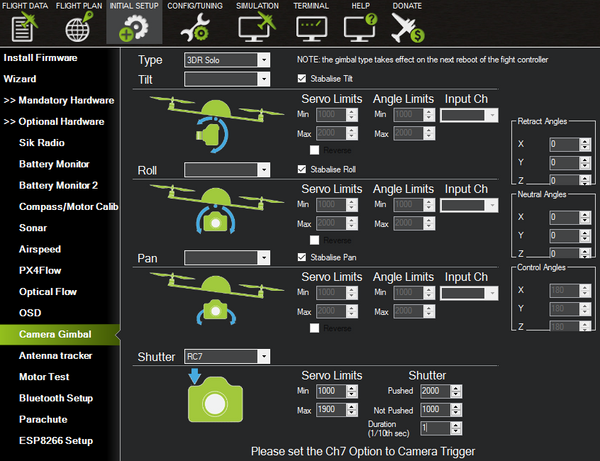
Navigate to "Flight Data" and then back to "Initial Setup" > "Optional Hardware" > "Camera Gimbal" and verify all settings are exactly as the above photo.
Step 6: Turn Survey3 camera on. Choose Photo setting icon in bottom right corner of rear LCD screen. Drag until you see Interval option and change to OFF. Do this for all cameras you want to trigger via PWM.
Step 7: Plug HDMI trigger cable wired to Pixhawk into the Survey3 cameras.
Step 8: Back in Mission Planner go to "Flight Data" screen, right click with mouse anywhere on the map, choose "Trigger Camera NOW" test camera trigger. If the camera(s) does not trigger then you may need to do a factory reset on the Pixhawk and redo the above steps in Mission Planner.

Step 9: Mission complete... safe flying! :)


Nolan Ramseyer
Author