How to Choose a Survey3 Camera Model
Choosing a Lens Option for Survey3:
We offer 2 different lenses for the Survey3 cameras: Survey3W (Wide) and Survey3N (Narrow). The terms wide and narrow refer to the lens' angle of view.
If you are using a drone that already has a camera and you are using the Interval timer trigger to capture photos, then you probably want to choose the wider Survey3W models. For example, the default lens on most consumer DJI drones (Mavic, Phantom, Inspire) has a wide angle so you want to choose the wider Survey3W model to match.
If you are using the Interval timer mode then typically you'll want to choose the wider Survey3W. If you are directly triggering the camera via PWM then you can choose either model that suites your required ground resolution (GSD). It is best to add the Survey3 camera profile data to your mission planning application so that the survey passes have the recommended side overlap.
Choosing a Filter Option for Survey3:
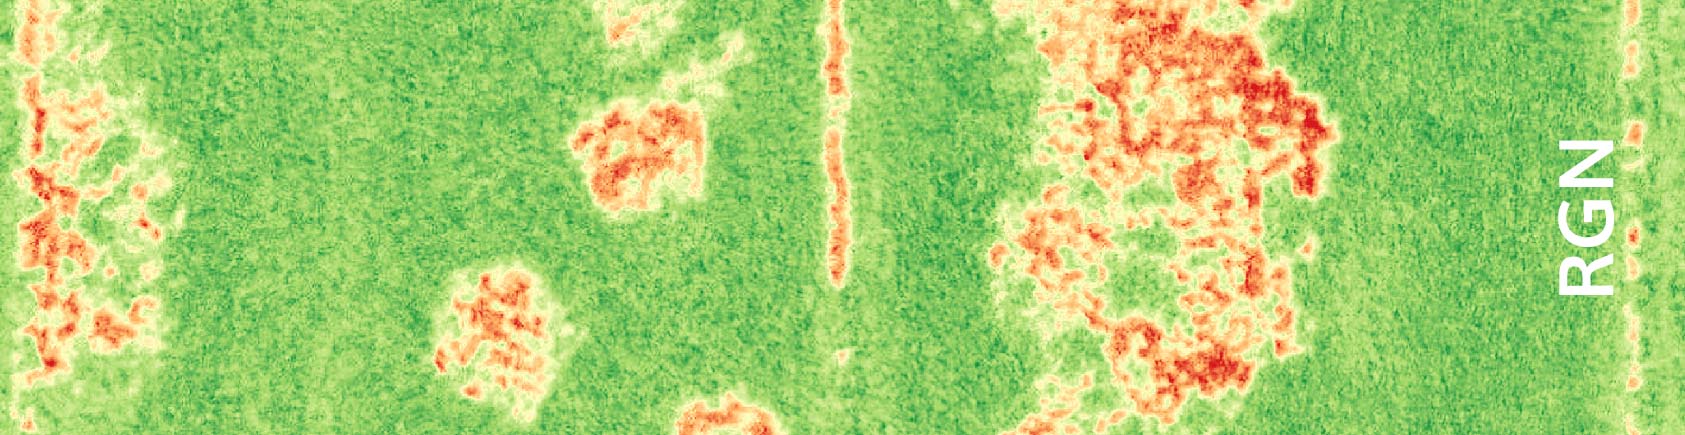

We offer 6 different filters for the Survey3 cameras: OCN, RGN, NGB, RE, NIR and RGB. The filters capture 3 channels of light information as follows:
| Spectrum Peak | Spectrum Width | Filter | Channel |
| 475nm | 15nm | NGB | 3 |
| 490nm | 36nm | OCN | 2 |
| 550nm | 15nm | NGB, RGN | 2 |
| 615nm | 42nm | OCN | 1 |
| 660nm | 15nm | RGN | 1 |
| 725nm | 23nm | RE | 1 |
| 808nm | 50mm | OCN | 3 |
| 850nm | 30mm | NGB, RGN, NIR | 1,3,1 |
OCN Filter (Orange + Cyan + NIR):
Red Image Channel = Orange Light
Green Image Channel = Cyan (Blue/Green) Light
Blue Image Channel = NIR (Near Infrared) Light
The OCN filter is an improvement to our RGN as it provides increased contrast within vegetation and reduces soil noise. It is better to use the OCN if there is soil among your vegetation, and the RGN if the crop has more of a solid canopy (low number of soil pixels). It can be used with the NDVI index just like the RGN filter. Please read HERE for more information about its benefits over the RGN filter. If you are looking for the best camera to buy to measure general plant health then the OCN models are your best option.
RGN Filter (Red + Green + NIR):
Red Image Channel = Red Light
Green Image Channel = Green Light
Blue Image Channel = NIR (Near Infrared) Light
The RGN filter is previously our most commonly purchased model mainly due to its ability to capture the Red and NIR wavelengths necessary for the popular NDVI index (see below for more information). NDVI is typically used as a general plant health and vigor index, basically it will show you what regions are healthiest compared to those areas that are not as healthy. Our new OCN filter typically provides better results which you can read about HERE in more details.
NGB Filter (NIR + Green + Blue):
Red Image Channel = NIR (Near Infrared) Light
Green Image Channel = Green Light
Blue Image Channel = Blue Light
The NGB filter is often times used for the ENDVI index, basically Enhanced NDVI. It takes the plant's green reflectance into account in determining plant health, instead of just using the reflected near infrared (NIR) light like the NDVI index uses. Some applications (like DroneDeploy for instance) don't allow you to compute ENDVI, so make sure to check which indices are supported. You can also compute the NDVI index using Blue vs NIR light, which may reveal different results compared to using the RGN camera. The best way to think about the difference between the RGN and NGB models is that most of the time the RGN model is the better choice, but the NGB model may show you something that the RGN cannot, so if your budget allows, using both cameras and comparing the results is recommended.
RedEdge Filter (RE):
Red Image Channel = RedEdge (725nm) Light
Green Image Channel = Not Used
Blue Image Channel = Not Used
The RedEdge filter is used to capture a single band of reflected light in the region known as the rededge. This region from about 700-800nm is where plants have varying reflectance which closely relates to their health. A plant reflecting more rededge light will typically be more healthy than a plant that is not. When processed with our MCC application, the output images will be a single image band, meaning black and white. A white pixel will be high rededge reflectance, and a black pixel low rededge reflectance. You can disregard the green and blue image channels as they will not contain useful data compared to the red channel.
Near Infrared Filter (NIR):
Red Image Channel = Near Infrared (850nm) Light
Green Image Channel = Not Used
Blue Image Channel = Not Used
The near infrared filter is used to capture a single band of reflected near infrared light. When processed with our MCC application, the output images will be a single image band, meaning black and white. A white pixel will be high NIR reflectance, and a black pixel low NIR reflectance. You can disregard the green and blue image channels as they will not contain useful data compared to the red channel.
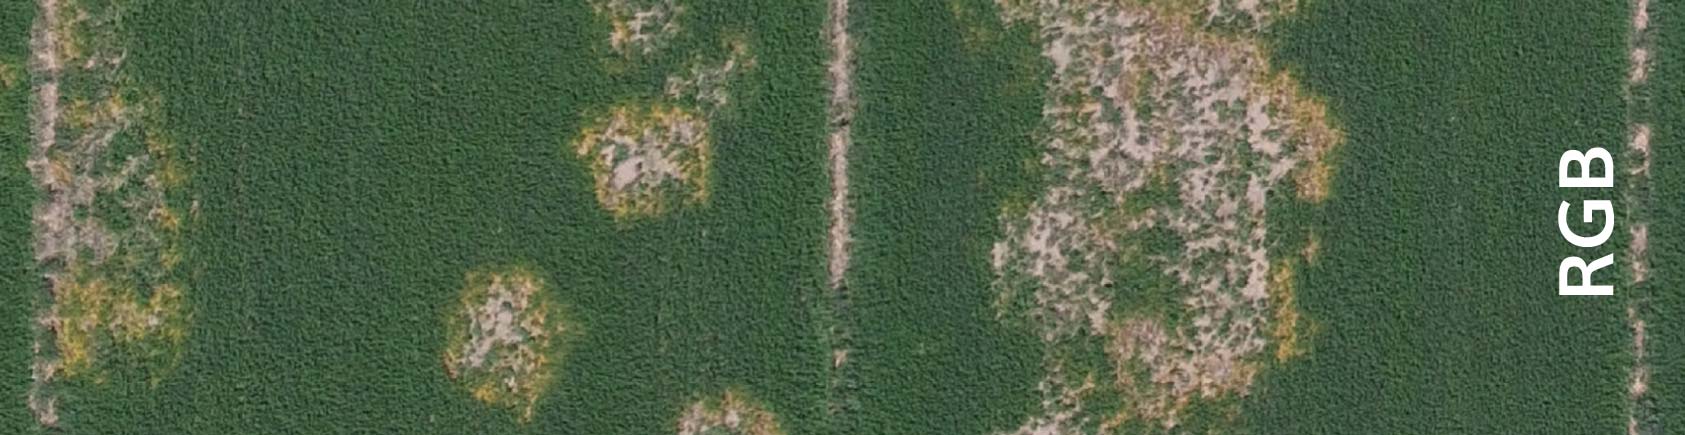
RGB Filter (Red + Green + Blue):
Red Image Channel = Red Light
Green Image Channel = Green Light
Blue Image Channel = Blue Light
The RGB filter is the typical filter that is installed on most cameras, which captures color light just like our eyes see the world. RGB cameras are commonly used along with multispectral ones to provide a reference image to the viewer. This reference is often times necessary to relate what our eyes see to what a camera capable of capturing near infrared (NIR) light sees.
Multispectral Index Formulas
Once the images are captured by the OCN, RGN, NGB, RE and NIR model cameras they should be calibrated using our Calibration Target. Once calibrated the images can be stitched in the program of your choice, such as Pix4D, Agisoft, Drone Deploy, Agribotix, MapsMadeEasy, Simactive, Icaros etc. Or you can upload to our MAPIR Cloud directly from the camera without needing to process in MCC.
Many of these applications provide what is called a raster/index calculator, that performs math on the image's pixels. The pixel values that result after computing the index represent a pixel range dependent on the index and what it is calculating. Many programs make this calculation a one-button process, but let's explain it in a little more detail:
Let's use the RGN filter as an example and compute the popular NDVI index:
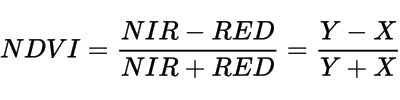
As you can see in the formula above the NDVI index uses the NIR and RED light. So for the RGN filter camera models, that would be the blue image channel (NIR) and the red image channel (RED). The processing program will take the pixel value in the red and blue image channels and plug it into the above equation. The resulting pixels will then all have a value ranging from -1 to +1. For plants, the NDVI values of the actual plants range from about 0.2 to 0.8. We then apply a color lut to the pixels so that our eyes can more easily interpret the data. The color lut is the green to yellow to red (high health to low health) colors you may have seen before.
An important mention about reflectance calibration using our ground targets:
The pixel values mentioned above which tell you whether you're looking at healthy plants or say nearby dirt are affected by the calibration procedure. Without calibrating the images the resulting values will most often be negative, basically garbage values. The resulting color lut picture, often called the "pretty picture" may show a similar green to yellow to red map but without calibration you won't be able to compare the results from one field location to another, one ambient lighting condition to another, or essentially one moment in time to another (week to week, month to month, etc). Without calibration you aren't aligning the pixel data to a known standard, so the values aren't going to be comparable. For more information on reflectance calibration in MCC please see this page.


Nolan Ramseyer
Author